Saturday, October 26, 2013

Comforts of Home

We FINALLY got the last bit of outside plaster done - until spring. Now we can focus on the inside of our house.

The first order of business was to get the hearth ready for the instillation of our wood burning stove. We have had amazing luck when it comes to finding things for the house at great prices. Our stove was no exception. We lucked into a really good used Pacific Energy stove and a great person to install it - thanks Justin of Bailey's Chimney Sweep!
First we decided on the location. Then we installed adobe bricks at the finished floor height where we wanted the hearth to go.

We collected large stones from the old foundation of Jack Young's home and general store. Mr. Young named Youngsville and had the first PO in his general store which was on one corner of our property. These stones are HEAVY!
This picture was taken in 1917. For those of you who have visited us, those trees are now the huge cottonwoods at the NE corner of our property. Little bits of foundation are all that's left of the store and home and now some of them are part of OUR home.

Had to also do some plastering.


Stones in place and ready for the stove.

Bailey's Chimney Sweep arrives to get it done.


First fire - comforts of home!


Stove installed means we now have HEAT. We have been making fires each day - just 'cause we can - and to make sure the stove works. It works beautifully and will make it very pleasant to work inside through the winter. Good thing we got a couple of cords of wood this summer!

The next major phase is to get a coat of mud slip all over the bales inside. I have covered a pile of dirt with plastic to keep it dry so that, hopefully, it won't freeze any time soon. Once the slip is on we will then start installing T&G for the ceiling and sheetrock for the framed walls. The finished plaster (and floor) will be done in the spring once things warm up and we are able to dig dirt again.


While I've been working on the slip, Rick has been sealing the wood on the doors and windows.

It feels really good to be working inside. There is still a lot to do but I'm beginning to see an end to it.


Friday, October 4, 2013

Reality Check

October is here already and after all the rain we got in September, we are still trying to get that second coat of plaster on the outside of the house. Time for a reality check! There's still so much left to do and just the earthen floors, which we can't get to until the ceiling is done, will take 2 to 3 weeks to dry - and then will need linseed oil finish which will also take time to dry.  By the middle of December the ground is going to freeze meaning we won't be able to dig dirt for the floors or plastering. I won't go into the rest of the list, just suffice it to say that there is just too little time between now and hard winter to get enough done to move in. Sad but true.

While I do not relish yet another winter in our trailer, I am feeling a whole lot less stressed about the house. There are still things I feel we need to get done before the middle of December but the list is a whole lot shorter and more doable. We're getting our wood burning stove in a couple of weeks and once a coat of mud is on the wall we will be able to have heat in the house. Work will continue!

So we push forward....

Rick got the garage doors installed so the house is totally enclosed and looking good!


And plastering continues. . .
I am so humbled and appreciative of all the plastering help we've gotten from our friends! We hope to have a plastering party in the next couple of weeks to get a good chunk of mud on the inside walls. Chili and cornbread anyone?

Corner is turned.

Rick getting a lot done.
Stay tuned . . .


Thursday, September 19, 2013

Rain, Rain GO AWAY!!!!

I think everyone around the country will agree that the weather this summer has been - well - freaky! New Mexico has been (and continues to be) in a drought. Most of the summer has been very, very dry. When the monsoon rains did finally get here they were spotty at best for us. That all changed about two weeks ago. While we have been very lucky, at times the rain has been relentless. Needless to say, it has put a real damper on our plastering. When last I posted we were finishing up the first coat of plaster. It's pretty important that we get the next coat of plaster on before freezing weather comes but with all the rain we've been having, it's been hard to even get started on this coat.
Lake Youngsville! And this was before the real heavy rain started. Grading and drainage are in the plans, we just haven't had the time to get to it. The lake got bigger once the rain started in earnest!

Rick spent most of an afternoon - in the rain - digging trenches. They worked and most of the lake got drained off - thank goodness!

There was nothing to do but move inside to work. It was a good time to trim the straw walls and corners and stuff holes. We also needed to bull-nose all the window and door openings. After working some more with the burlap, I decided that reed mat fencing would work much better for this job.
Reed fencing - available at the local hardware store.

Step one was to remove one of the reeds at the width needed for the opening.

Once that was done, I could cut the wires . . . 

then twist them so that the mat would continue to hold together.
The piece was then stapled to the frame. The hardest part was filling in all the holes and spaces with straw so that once the mat was in place, it would be firm and give a good solid surface on which to plaster.

After the holes were filled and the mat pulled around the bales, landscape pins were used to hold it snuggly in place.  

Done. This looks really good and I think will make for a great surface on which to plaster.

Rick stuffing holes.

The corner by the front door really needed some work. The horizontal board we inserted to give us something to hang things from was not level. A wedge had to be inserted and hammered in to raise one end. This left gaps that needed to be filled with cob.

It took a lot of cob to fill these holes! (And of this writing, it's still not dry!!)

Reed mat in place. It looks much better and a lot more even!

I have managed - in between rainy days - to get a little of the second coat of plaster on.
The first application.


Yesterday our friend, Jan, came over to help. 
We got about 1/2 load of plaster applied before we had a sever storm with heavy, driving rain. This was the kind of rain we don't usually get but, I must say, it was a good test of the plaster!
Before

After!
As you can see, the rain left divots but, by and large, the plaster held up very well! At least I will be more comfortable through the winter once this second coat is done! (That is if it ever stops raining!)

The other good news is that through all this wet weather the inside of the house continues to be snug and dry!

The rain has brought wild flowers and today the sun is shining  - and the weather forecast is for more sun and dryer weather for the next week!  On with the plastering!!!


Sunday, September 1, 2013

SSS - Scoop, Slap & Smooth - a Family Affair

June a year ago when my son and his family came for a visit we had just finished putting up the roof trusses. This year we are working on finishing the outside plastering. Oh what difference a year makes!

But first we moved all the rest of the bales that were stacked in the office outside and made a fort for our grandsons - ages 4 & 5. They loved it!
Mom showing the boys the secret doorway.

Having fun!

Wow! What a nice space this is without the bales! This is going to be a wonderful place for an office.

I think Rick and Dylan wanted to avoid plastering as long as they could so they decided to install our great 8' French doors first. These go into the office. The plywood to the right is Rick's painting wall in the studio.

Scoop, Slap & Smooth - Finally it was on to plastering.

We spent the week focusing on getting plaster on the rest of the house as far up as we could reach. This way if it rains the house is more protected. We decided to continue applying the plaster by hand for a few reasons: 1) it's much easier - for me, at least - to spread by hand than to use a trowel and hawk; 2) we're able to scoop up the plaster, slap it on to make sure it gets in all the nooks and crannies and smooth it out in one movement.  Traditionally this was a job for the women of the pueblos. The plaster was always applied by hand in large sweeping half circles. After the job was done the hand prints were visible as were the overlapping arches. Part of me wants that for our house. Once this first coat of plaster is done, I'll experiment using a trowel and applying by hand to see what we like better. Our house is very "rustic" so I'm currently leaning toward continuing the plastering with our hands.

My son, Dylan, mixing his first batch of plaster. We just about wore him out <g>

Dylan and Rick applying plaster to the west wall.

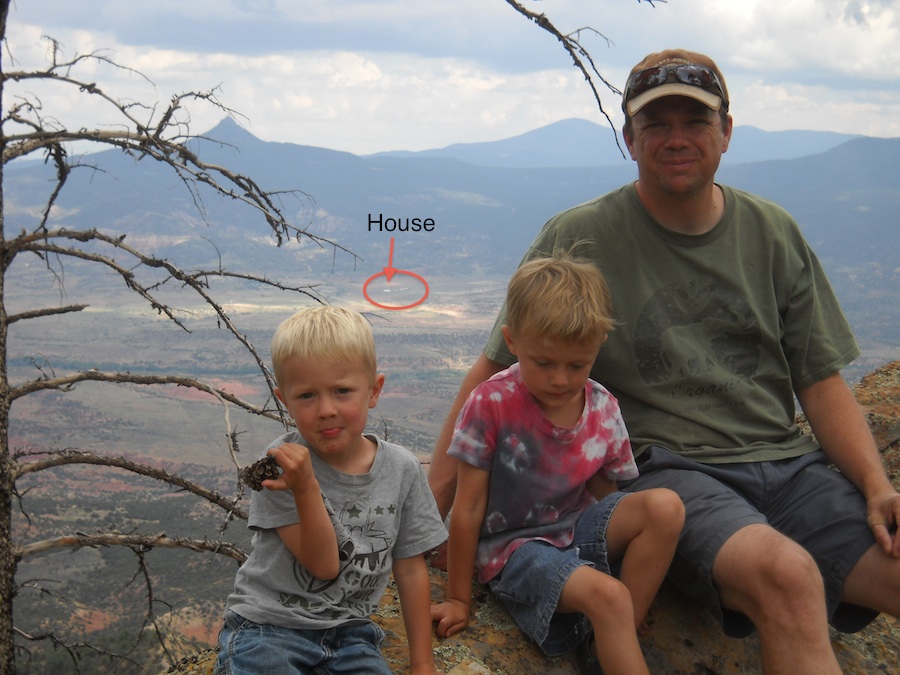
The week wasn't all work, though. We took the family on a drive up to Mesa Alta - the large mesa just to the NW of us. The boys had fun finding pine cones and we enjoyed a lovely afternoon doing something other than working on the house.
Kyler, Riley and Dylan up on Mesa Alta with the house in the background.
I wish it had been just a little less hazy but we could still see the house from up there.

Then they were all gone!  Dylan and family back to their home and Rick to California for a convention. Boy is it quiet! I'm here with the dogs and the plastering, working on the top 3 feet left of the first coat.

******
One afternoon the weather turned blowy and rainy so I decided to finish the glass block and bottle section above the picture window in the sun space. We sort of mis-calculated the size of space needed in the adobe wall for the window which left us with the opportunity to be creative. We had 5 glass blocks we had collected from here and there (one from my friend Lorraine's studio when she moved from San Diego - I've been carrying that one around for about 15 years!) They filled most of the space and the rest of the space we decided to fill with beer bottles.
Bottles washed and labels removed.
Glass blocks in place.

From the outside

From the inside - this was a hard picture to take because it was so bright outside but you get the idea.

I like the way the bottles look from the outside but wasn't real happy with the way they looked from the inside. Just not to fond of the open bottles sticking out. So I decided to look for glass stoppers - something to give the bottles a little more finished look. I found some offered on e-bay. Really cool antique glass bottle stoppers - just what I was looking for!


Just the thing!

I'm hoping to finish the first coat of plaster by the end of the week so we can start on the second coat. This is really taking some time but hope to be working inside by the middle of September.

*******

Labor Intensive!

We are building this house ourselves because it's the only way we can have the house we want. We are committed to doing our best to build this house without a mortgage and doing it ourselves is the only way! But I have a whole new respect for the term "labor intensive"!!! Yes, stacking straw bales is not very hard and yes, plastering with earth is pretty easy and kind of fun but it is VERY labor intensive! We are going to have a wonderful home, one that feels warm and inviting but doing it ourselves is the only way we could have that home. I now know why quotes from contractors to build straw bale homes are so high. There is nothing conventional about building this way and no matter how you do it, it's going to be labor intensive! Maybe we'll win the Lotto and can hire a crew to finish the plastering.

Nah - probably not......